A cold joint is the single most common reason a freshly-built circuit “sometimes works” — it looks connected, it might even test continuous with a multimeter held still, and then it fails the moment the board gets nudged or the temperature in the room changes. If you’ve built your first soldered circuit recently and have a joint or two that don’t look quite right, this is what to do about them.
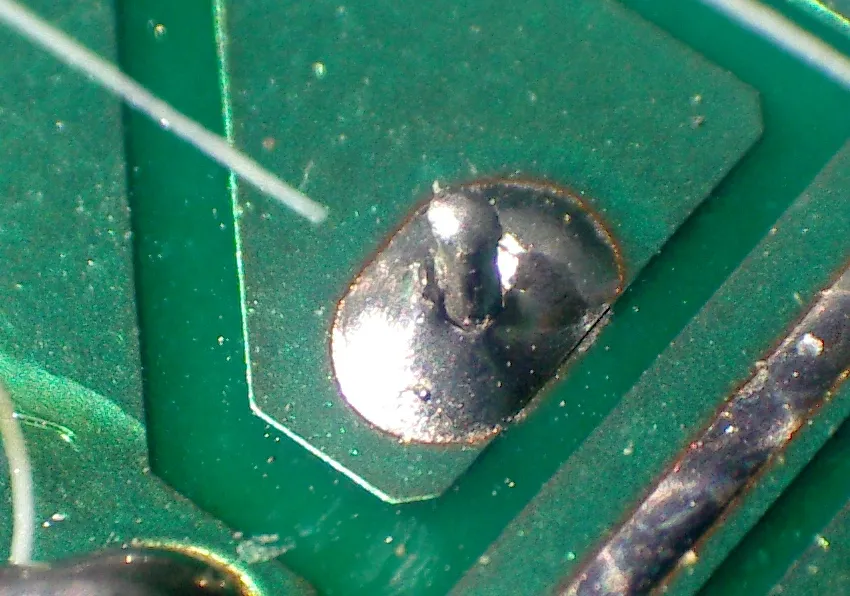
A cold solder joint — dull and grainy instead of shiny. Photo: Coronium, CC BY-SA 3.0 (resized)
What causes it
A cold joint happens when the solder melts and flows without the component leg and the copper pad both being hot enough to properly bond with it. The solder solidifies around the joint instead of into it — it can look roughly the right shape from a distance, but under magnification (or just decent lighting) it’s dull, grainy, or slightly cracked instead of smooth and shiny. Electrically, it’s often high-resistance rather than fully open, which is exactly why it’s such an insidious fault: it can pass a continuity beep, carry a small signal current fine, and then drop out the moment the board flexes or a slightly higher current tries to pass through.
The two most common root causes, both covered in more depth in how to solder your first circuit:
- The iron wasn’t hot enough, or wasn’t given long enough (a couple of seconds) touching both the leg and the pad before solder was fed in.
- The joint moved while the solder was still liquid — even a slight wobble as it cools disturbs the crystal structure as it solidifies, leaving that same dull, fractured look even if the heat itself was fine.
A tip caked in old oxidised solder is a frequent hidden contributor to the first cause — it looks like plenty of heat is available, but a dirty tip transfers that heat into the joint far less efficiently than a clean, freshly-tinned one.
How to fix one that’s already on the board
Don’t just pile more solder on top. That’s the instinctive fix and it rarely works — it adds bulk without adding heat where the original bond failed, so the new solder sits on top of an already-bad joint rather than replacing it.
- Reheat the existing joint properly. Touch the iron to the leg and pad together, the same way as making a fresh joint, and hold for a couple of seconds until the existing solder fully re-melts and visibly flows — don’t just tap it.
- Feed a small amount of fresh solder in while it’s molten, mainly to add flux back into the joint (flux burns off during soldering, and old solder has none left) rather than to add much bulk. Fresh flux helps the reheated solder wet the surfaces properly on its way back to solid.
- Hold everything still while it cools. This is the step that gets skipped when people are in a hurry to check the fix worked — resist prodding the joint for a few seconds after the iron comes away.
- Check it went shiny. A properly re-fixed joint should now look like a smooth, glossy cone rather than the dull texture it started with. If it still looks grainy after reheating, the iron probably isn’t hot enough or the tip needs cleaning — not a sign to add yet more solder.
When there’s too much solder to fix by reheating alone
Sometimes a joint has enough excess solder — or enough has bridged to a neighbouring pad — that reheating alone won’t produce a clean result; the old solder needs removing first. A manual desoldering pump works well on plated through-holes with a reasonable amount of excess — heat the joint until the solder is fully molten, then trigger the pump right next to the tip to suck the molten solder out in one go. For finer work, or solder that’s bridged between adjacent pins, desoldering braid (solder wick) laid over the joint and heated through draws the solder up into the braid by capillary action — better suited to SMD pins and tight spacing than a pump is. Either way, once the pad is clean, resolder the joint fresh rather than trying to reheat a partial mix of old and new solder.
Old, dried-out flux is a common repeat offender
If a board that’s been sitting a while — or one that’s been reheated a couple of times already — keeps producing dull joints even with good iron technique, the flux core in old solder or the flux residue already on the board can be part of the problem; it degrades over time and stops helping the solder wet properly. A flux pen applied directly to a stubborn joint before reheating adds fresh flux back in and often turns a joint that’s been fought over twice into a clean one on the third try.
The habit that prevents most of these
Give the iron the full couple of minutes to reach actual temperature before starting — not just “feels warm” — and hold each joint for the full one-to-two seconds with the tip touching both surfaces before feeding solder in, exactly as covered in how to solder your first circuit. Almost every cold joint traces back to rushing one of those two steps, and the fix habit is the same as the prevention habit: heat first, solder second, then leave it alone to cool.

